我们解析的源码是 React18.1.0 版本,请注意版本号。React 源码学习的 GitHub 仓库地址:https://github.com/wenzi0github/react。
我们接下来的文章是进行 React 源码解析的,已默认您已很熟练使用 React,并阅读过React 的官方文档。
我们在阅读 React 源码之前,先熟悉几个概念,这样读起来会顺畅很多。
1. 什么是 jsx #
我们在 React 中写的类似于 html 的结构就被称为 JSX,但他并不是 html,而是一个 JavaScript 的语法扩展。即他是 js,而不是 html。
官方文档:
const App = () => {
  const handleClick = () => {
    console.log('click');
  };

  return (
    <div onClick={handleClick}>
      <p>hello world</p>
    </div>
  );
};
这里我们不讲解 jsx 的使用方式,主要说下 JSX 的作用。jsx 是 js 的语法糖,方便我们开发者的维护。最后实际上会被 React(React16.x 及之前)或 babel 编译(React17.0 及更新)成用 createElement 编译的结构。
同样的,我们在 React 中像下面这样写的效果是一样的:
createElement('div', { onClick: handleClick }, createElement('p', null, 'hello world'));
但这种方式使用起来确实不方便。
2. createElement 是用来干嘛的 #
上面提到会将 jsx 编译成由 createElement()函数组成的一个嵌套结果。那么 createElement 里具体都干了什么呢?
在 React16 及之前,createElement()方法是 React 中的一个方法,因此有些同学就会有疑问,在写.jsx的组件时,本来没用到 React 中的方法,但还是要引入 React。就如上面的代码,在 React16 及之前,要在头部显式地将 React 引入进来的。
import React from 'react';
最终转换出的代码是:
React.createElement('div', { onClick: handleClick }, React.createElement('p', null, 'hello world'));
但从 React17 开始,React 和 babel 合作,将 jsx 的转换工作放到了编译工具 babel 中。新的 JSX 转换不会将 JSX 转换为 React.createElement,而是自动从 React 的 package 中引入新的入口函数并调用。
假设你的源代码如下:
function App() {
  return <h1>Hello World</h1>;
}
下方是新 JSX 被转换编译后的结果:
// 由编译器引入(禁止自己引入!)
import { jsx as _jsx } from 'react/jsx-runtime';

function App() {
  return _jsx('h1', { children: 'Hello world' });
}
注意,此时源代码无需引入 React 即可使用 JSX 了!若仍然要使用 React 提供的 Hook 等功能,还是需要引入 React 的。
可以看到新 jsx()和之前的 React.createElement()方法转换出来的结构稍微有点区别。之前的 React.createElement()方法里,子结构会通过第三个参数进行传入;而在 jsx()方法中,这里将子结构放到了第二个参数的 children 字段里,第 3 个字段则用于传入设置的 key 属性。若子结构中只有一个子元素,那么 children 就是一个 jsx(),若有多个元素时,则会转为数组:
const App = () => {
  return jsx('div', {
    children: jsx('p', {
      children: [
        jsx('span', {
          className: 'dd',
          children: 'hello world',
        }),
        _jsx('span', {
          children: '123',
        }),
      ],
    }),
  });
};
这里有个 babel 的在线网站,我们可以编写一段 React 代码,能实时看到通过 babel 编译后的效果:React 通过 babel 实现新的 jsx 转换。若 jsx 的转换方式还是旧版的,请在左侧的配置中,将 React Runtime 设置为 automatic 。
那么 jsx()方法里具体是怎么执行的呢?最后返回了样子的数据呢?源码位置:jsx()。
jsx()方法会先进行一系列的判断,相关链接: 介绍全新的 JSX 转换。jsx()方法中,会经过一些判断,将 key 和 ref 两个比较特殊的属性单独提取出来。
/**
 * 将jsx编译为普通的js树形结构
 * @param {string|function} type 若节点为普通html标签时,type为标签的tagName,若为组件时,即为该函数
 * @param {object} config 该节点所有的属性,包括children
 * @param {string?} maybeKey 显式地设置的key属性
 * @returns {*}
 */
export function jsx(type, config, maybeKey) {
  let propName;

  // Reserved names are extracted
  const props = {};

  let key = null;
  let ref = null;

  // 若设置了key,则使用该key
  if (maybeKey !== undefined) {
    if (__DEV__) {
      checkKeyStringCoercion(maybeKey);
    }
    key = '' + maybeKey;
  }

  // 若config中设置了key,则使用config中的key
  if (hasValidKey(config)) {
    if (__DEV__) {
      checkKeyStringCoercion(config.key);
    }
    key = '' + config.key;
  }

  // 提取设置的ref属性
  if (hasValidRef(config)) {
    ref = config.ref;
  }

  // Remaining properties are added to a new props object
  // 剩余属性将添加到新的props对象中
  for (propName in config) {
    if (hasOwnProperty.call(config, propName) && !RESERVED_PROPS.hasOwnProperty(propName)) {
      props[propName] = config[propName];
    }
  }

  /**
   * 我们的节点有有三种类型:
   * 1. 普通的html标签,type为该标签的tagName,如div, span等;
   * 2. 当前是Function Component节点时,则type该组件的函数体,即可以执行type();
   * 3. 当前是Class Component节点,则type为该class,可以new出一个实例;
   * 而type对应的是Function Component时,可以给该组件添加defaultProps属性,
   * 当设置了defaultProps,则将未明确传入的属性给到props里
   */
  // Resolve default props
  if (type && type.defaultProps) {
    const defaultProps = type.defaultProps;
    for (propName in defaultProps) {
      if (props[propName] === undefined) {
        props[propName] = defaultProps[propName];
      }
    }
  }

  /**
   * 参数处理完成后,就调用ReactElement()方法返回一个object结构
   */
  return ReactElement(type, key, ref, undefined, undefined, ReactCurrentOwner.current, props);
}
ReactElement()方法的作用就是返回一个 object 结构,我们这里把所有的提示代码都去掉:
/**
 * Factory method to create a new React element. This no longer adheres to
 * the class pattern, so do not use new to call it. Also, instanceof check
 * will not work. Instead test $$typeof field against Symbol.for('react.element') to check
 * if something is a React Element.
 */
const ReactElement = function(type, key, ref, self, source, owner, props) {
  const element = {
    // This tag allows us to uniquely identify this as a React Element
    $$typeof: REACT_ELEMENT_TYPE, // 用来标识当前是否是React元素

    /**
     * 我们的节点有有三种类型:
     * 1. 普通的html标签,type为该标签的tagName,如div, span等;
     * 2. 当前是Function Component节点时,则type该组件的函数体,即可以执行type();
     * 3. 当前是Class Component节点,则type为该class,可以通过该type,new出一个实例;
     * 而type对应的是Function Component时,可以给该组件添加defaultProps属性,
     * 当设置了defaultProps,则将未明确传入的属性给到props里
     */
    // Built-in properties that belong on the element
    type: type,
    key: key,
    ref: ref,
    props: props,

    // Record the component responsible for creating this element.
    _owner: owner,
  };

  return element;
};
上面方法注释的大概意思是:现在不再使用类的方式 new 出一个实例来,因此不再使用 instanceOf 来判断是否是 React 元素;而是判断 $$typeof 字段是否等于Symbol.for('react.element')来判断。
我们已经知道 $$typeof 字段的作用是为了标识 React 元素的,但他的值为什么用 Symbol 类型呢?可以参考这篇文章:为什么React元素有一个$$typeof属性?
到目前位置,我们已经知道了 jsx 在传入 render()方法之前,会编译成什么样子。
我们在*.jsx文件中,先直接输出下 jsx 的结构:
console.log(
  <div>
    <span>hello world</span>
  </div>,
);
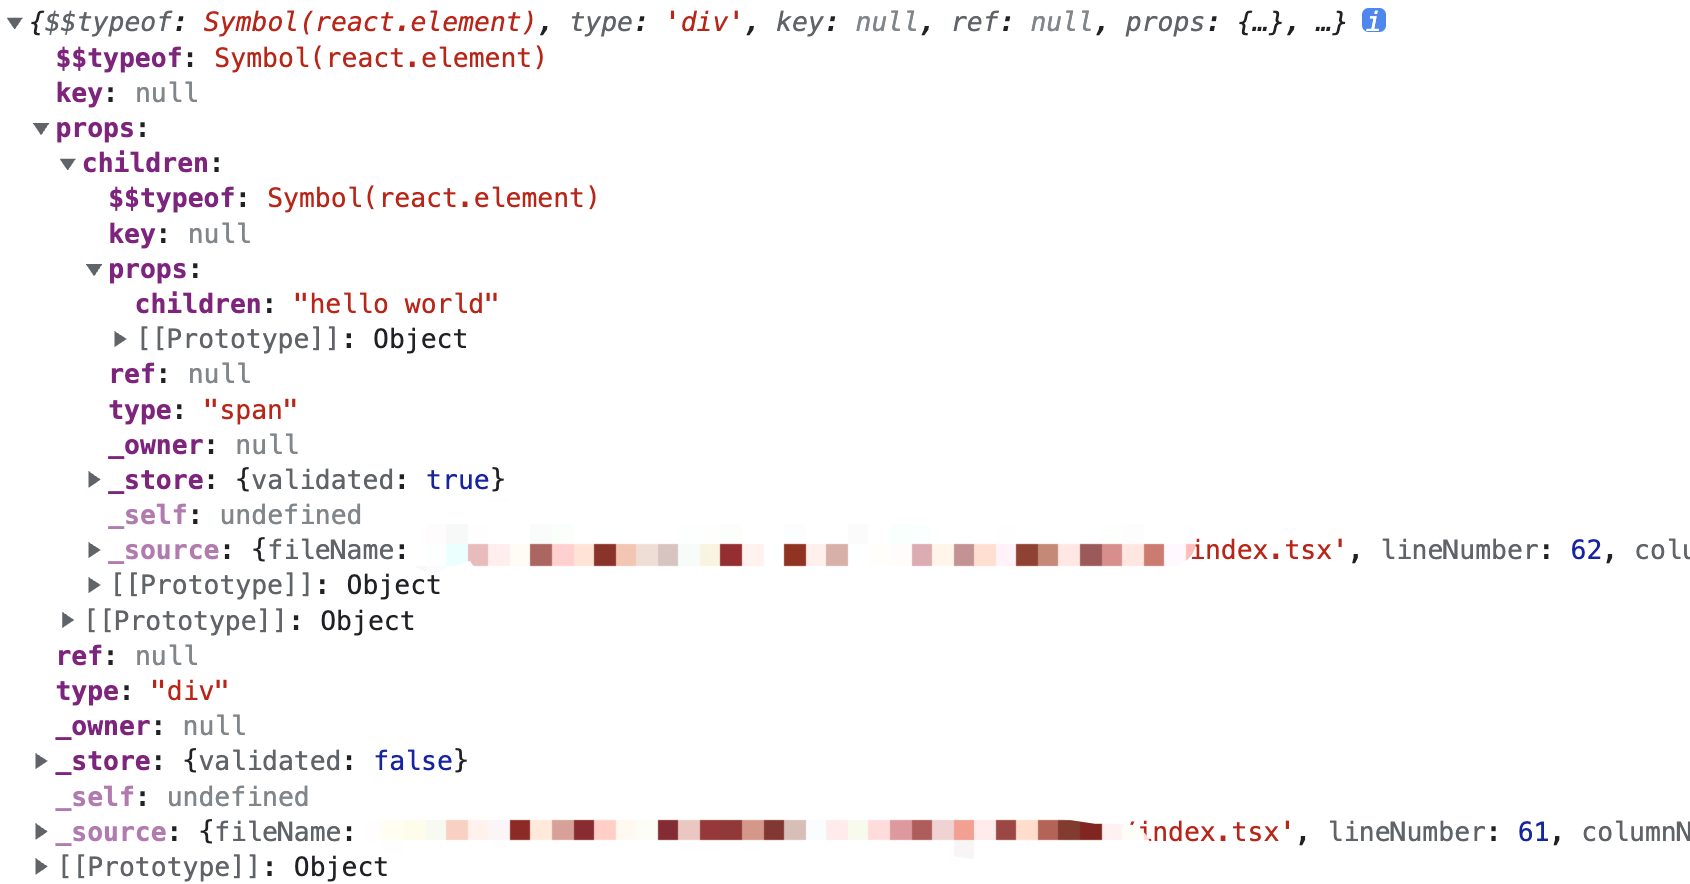
在控制台里就能看到这样的结构:

const element = {
  $$typeof: Symbol(react.element),
  key: null,
  props: {
    children: {
      // 当children有多个时,会转为数组类型
      $$typeof: Symbol(react.element),
      key: null,
      props: {
        children: 'hello world', // 文本节点没有类型
      },
      ref: null,
      type: 'span',
    },
  },
  ref: null,
  type: 'div',
};
我们再输出一个完整的组件,如一个 App 组件如下:
const App = ({ username }) => {
  return (
    <div>
      <span>hello {username}</span>
    </div>
  );
};
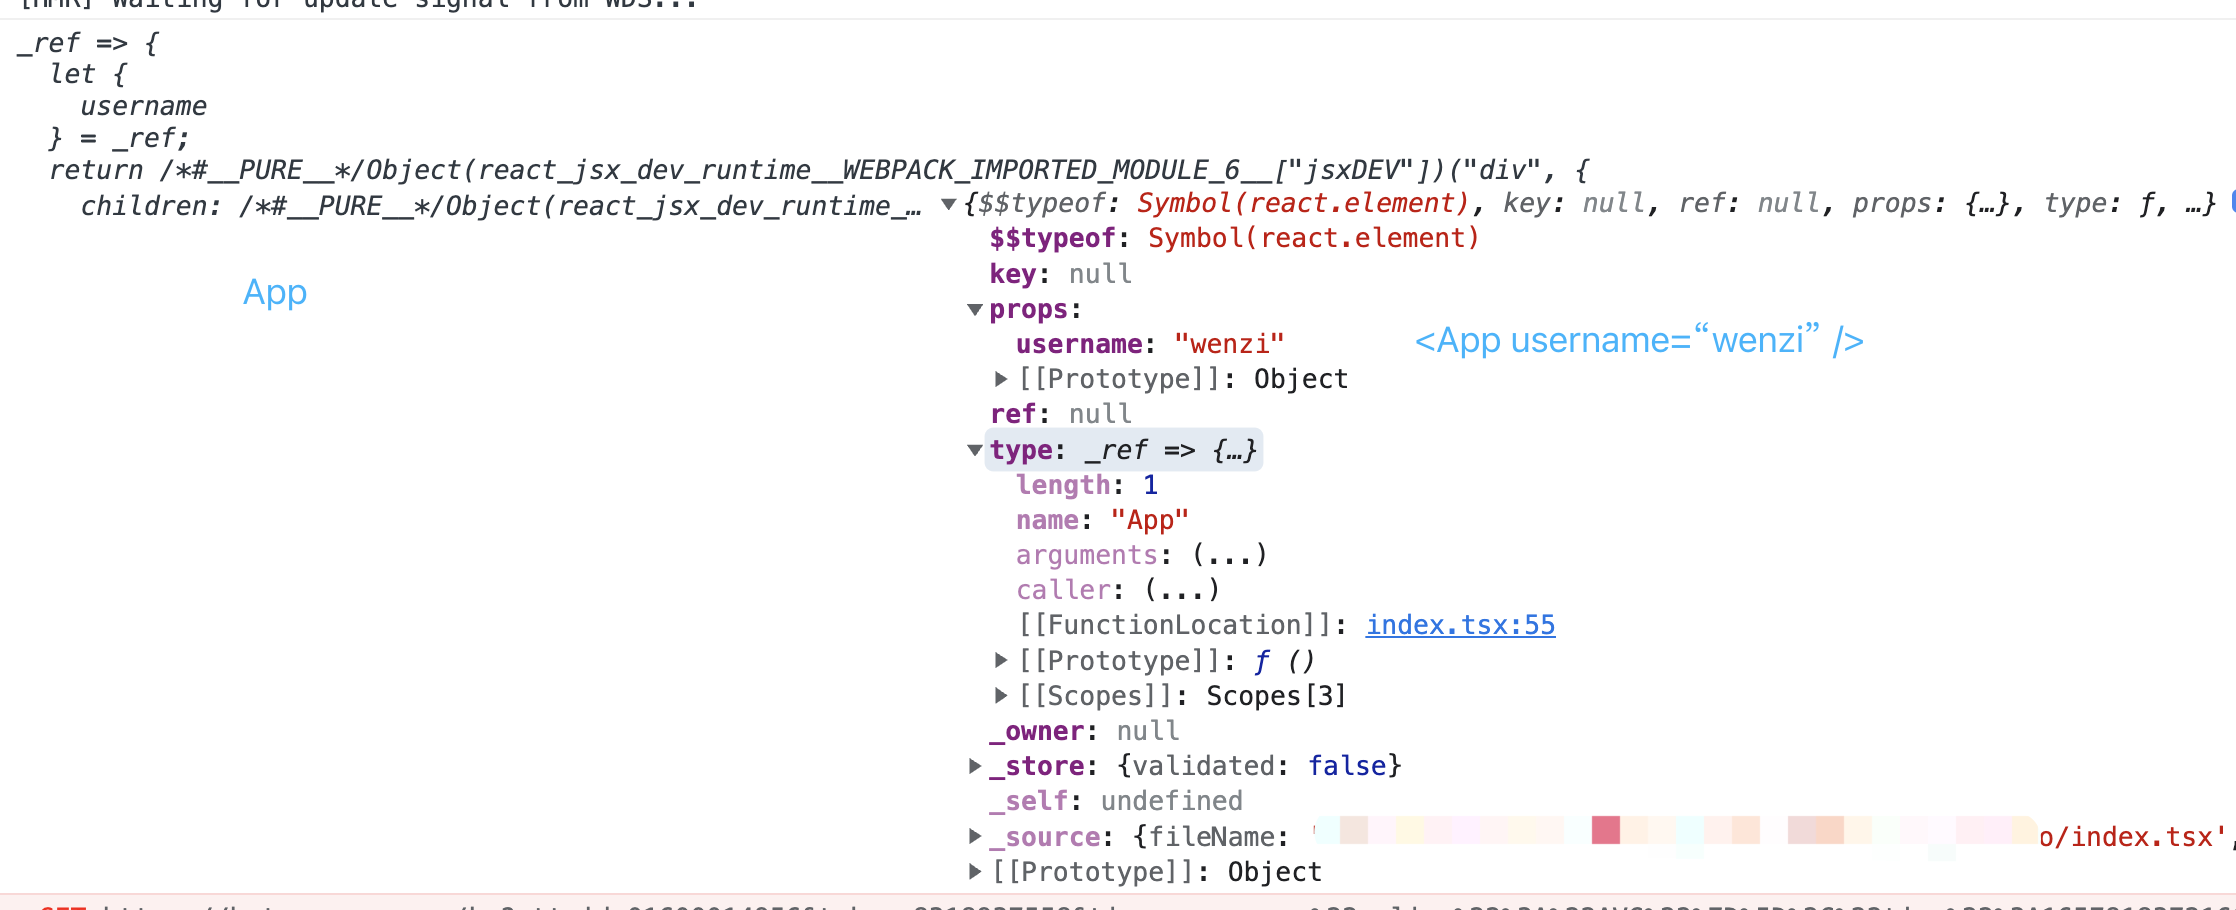
分别输出下 App 和
console.log(<App />, App);

单纯的App是一个函数,function 类型,但这里不能直接执行App(),会报错的;而<App />则是一个 json 结构,object 类型的,其本来的方法则存放到了 type 字段中。
我们在上面的代码中已经说了 type 字段的含义,这里再说下跟 type 相关的 children 字段。当 type 为 html 标签时,children 就其下面所有的子节点。当只有一个子节点时,children 为 object 类型,当有多个子节点时,children 是 array 类型。
有些同学可能一时反应不过来,觉得组件type字段对应的 function 或 class 来获得。如:
const Start = (
  <div>
    <App>
      <p>this is app children</p>
    </App>
  </div>
);
这里<App>标签里的 p 标签才是他的 children。
因此,在传入到 render()方法时,就是这样子的一个 object 类型的 element 元素。
3. fiber 结构 #
在上面通过 babel 转换后的 object 类似的数据,会在 render()方法中将其转为 fiber 结构。render()方法里具体怎样转换的,我们稍后再讲,这里我们只是看下 fiber 节点的结构。
/**
 * 创建fiber节点
 * @param {WorkTag} tag
 * @param {mixed} pendingProps
 * @param {null | string} key
 * @param {TypeOfMode} mode
 * @constructor
 */
function FiberNode(tag: WorkTag, pendingProps: mixed, key: null | string, mode: TypeOfMode) {
  // Instance
  this.tag = tag; // 当前节点的类型,如 FunctionComponent, ClassComponent 等

  /**
   * 这个字段和 react element 的 key 的含义和内容有一样(因为这个 key 是
   * 从 react element 的key 那里直接拷贝赋值过来的),作为 children 列表
   * 中每一个 item 的唯一标识。它被用于帮助 React 去计算出哪个 item 被修改了,
   * 哪个 item 是新增的,哪个 item 被删除了。
   * @type {string}
   */
  this.key = key;
  this.elementType = null;

  /**
   * 当前fiber节点的元素类型,与React Element里的type类型一样,若是原生的html标签,
   * 则 type 为该标签的类型('div', 'span' 等);若是自定义的Class Component或
   * Function Component等,则该type的值就是该class或function,后续会按照上面的tag字段,
   * 来决定是用new初始化一个实例(当前是 Class Component),然后执行该class内
   * 的render()方法;还是执行该type(当前是 Function Component),得到其返回值;
   */
  this.type = null;

  /**
   * 1. 若当前fiber节点是dom元素,则对应的是真实DOM元素;
   * 2. 若当前是function component,则值为null;
   * 3. 若当前是class component,则值为class初始化出来的实例
   */
  this.stateNode = null;

  /**
   * 下面的return, child和sibling都是指针,用来指向到其他的fiber节点,
   * React会将jsx编译成的element结构,转为以fiber为节点的链表结构,
   * return: 指向到父级fiber节点;
   * child: 指向到该节点的第1个子节点;
   * sibling: 指向到该节点的下一个兄弟节点;
   * 如图所示:https://pic4.zhimg.com/80/v2-a825372d761879bd1639016e6db93947_1440w.jpg
   */
  this.return = null;
  this.child = null;
  this.sibling = null;
  this.index = 0;

  this.ref = null;

  this.pendingProps = pendingProps;
  this.memoizedProps = null;
  this.updateQueue = null;
  this.memoizedState = null;
  this.dependencies = null;

  this.mode = mode;

  // Effects
  this.flags = NoFlags; // 该节点更新的优先级,若为NoFlags时,则表示不更新
  this.subtreeFlags = NoFlags; // 子节点的更新情况,若为NoFlags,则表示其子节点不更新,在diff时可以直接跳过
  this.deletions = null; // 子节点中需要删除的节点

  this.lanes = NoLanes;
  this.childLanes = NoLanes;

  /**
   * 双缓冲:防止数据丢失,提高效率(之后Dom-diff的时候可以直接比较或者使用
   * React在进行diff更新时,会维护两颗fiber树,一个是当前正在展示的,一个是
   * 通过diff对比后要更新的树,这两棵树中的每个fiber节点通过 alternate 属性
   * 进行互相指向。
   */
  this.alternate = null;
}
React 中大到组件,小到 html 标签,都会转为 fiber 节点构建的 fiber 链表。
为什么要使用 fiber 链表?这里我们稍微了解下,后面会详细介绍 fiber 链表如何进行 diff 每个 fiber 节点的。
3.1 Stack Reconciler #
在 React 15.x 版本以及之前的版本,Reconciliation 算法采用了栈调和器( Stack Reconciler )来实现,但是这个时期的栈调和器存在一些缺陷:不能暂停渲染任务,不能切分任务,无法有效平衡组件更新渲染与动画相关任务的执行顺序,即不能划分任务的优先级(这样有可能导致重要任务卡顿、动画掉帧等问题)。Stack Reconciler 的实现。
3.2 Fiber Reconciler #
为了解决 Stack Reconciler 中固有的问题,以及一些历史遗留问题,在 React 16 版本推出了新的 Reconciliation 算法的调和器—— Fiber 调和器(Fiber Reconciler)来替代栈调和器。Fiber Reconciler 将会利用调度器(Scheduler)来帮忙处理组件渲染/更新的工作。此外,引入 fiber 这个概念后,原来的 react element tree 有了一棵对应的 fiber node tree。在 diff 两棵 react element tree 的差异时,Fiber Reconciler 会基于 fiber node tree 来使用 diff 算法,通过 fiber node 的 return、child、sibling 属性能更方便的遍历 fiber node tree,从而更高效地完成 diff 算法。
fiber 调度的优点:
- 能够把可中断的任务切片处理;
- 能够调整任务优先级,重置并复用任务;
- 可以在父子组件任务间前进后退切换任务;
- render 方法可以返回多个元素(即可以返回数组);
- 支持异常边界处理异常;
4. 总结 #
fiber 现在是整个 React 应用的基础,无论是整个结构树,还是优先级的调度,或者是 diff 对比等,都是以 fiber 为基础的。